
Despite the availability of enterprise-grade platforms, UK companies struggle to deploy business-critical software, with 80% of deployments delayed by nearly four months on average. The main culprits? Understaffed IT teams and poor automation.
In this guide, we walk you through a clear, step-by-step process to set up a virtual data room properly, so your team can avoid delays and start working on confidential documents securely from day one.
Data room setup: Start-to-finish guide
By 2026, 75% of companies will embrace digital technologies and cloud solutions, including virtual workspaces and virtual data rooms, according to Gartner. However, you can get a competitive edge early by following these simple steps:
- Define your data room’s purpose and structure
- Select the best VDR provider
- Create an admin account
- Create a data room project
- Organize folder & file structure
- Set roles, groups, and permissions
Step #1: Define your data room’s purpose and structure
Before evaluating providers, clarify your core objectives. Proper planning prevents security gaps and ensures your data room accelerates rather than hinders business processes.
Identify your core use case
Virtual data rooms require robust security and workflow controls for all transactions. Universal essentials include access expiration, granular permission tiers, dynamic watermarking, Q&A workflows, audit trails, and version control. While these fundamentals apply universally, their operational focus shifts based on your transaction type:
In M&A due diligence process, prioritise multi-party coordination with tiered access for advisors and automated expiration for competing bidders. For fundraising, configure investor portal workflows like dedicated Q&A modules and investor-specific activity alerts.
Legal audits demand time-bound access for regulators and automated retention policies, while IPOs require forensic watermarking and dual-admin approvals for financial documents. Across all data room types, establish measurable targets upfront, such as 30-50% faster document retrieval, real-time activity tracking, 100% audit compliance, and 90%+ user adoption within one week.
Sketch your data room structure
A logical hierarchy is essential for due diligence efficiency. A well-structured data room typically features the following:
Corporate Documents
- Certificate of Incorporation
- Shareholder Agreements
- Board Resolutions
Financial Records
- Audited Financial Statements (Last three years)
- Management Accounts
- Tax Compliance Filings
Legal Contracts
- Material Customer Agreements
- Supplier Contracts
- Intellectual Property Registrations
Commercial Operations
- Sales Pipeline Reports
- Marketing Strategy Documents
- Partnership Agreements
Human Resources
- Organisational Charts
- Key Employee Contracts
- Equity Incentive Plans
Step# 2: Select the best VDR provider
You need to select a reliable, secure, and scalable VDR solution. The right product will ensure a friendly user experience and a considerable productivity boost. You can consider the following criteria while choosing a virtual data room provider:
- Cost structure. Many data room providers offer flat-rate, per-page, or per-user pricing. The flat-rate pricing is the best approach overall as it suits all types of projects.
- Scalability. Ensure the selected data room allows for extra projects, users, administrators, and document storage.
- Security measures. Robust security features prevent unauthorised access to sensitive data and minimise data breach possibilities.
- Information rights management (IRM). IRM tools enable full control of access to sensitive files, including remote access revocation and instant data wipe.
- Integration capabilities. Consider which VDR integrations will be useful in your workflows.
- Security compliance. Consider ISO 27001, GDPR, HIPAA, CCPA, SOC 1/2/3, and other certificates.
- Document management. Prioritise bulk drag-and-drop functionality, full-text search, automated indexing, and other capabilities for managing large data volumes.
Best VDR selection practices
To ensure you choose the best virtual data room software for your business needs, follow these four best practices.
| Trial period | Subscribe to a free trial period to test VDR features and capabilities, such as AI tools or user roles, first-hand. Prioritise data room providers that unlock all available features during a free trial period. |
| Customer support test | Check the response time of email, phone, and live chat support. Ask a technical support team for help during a free trial period. |
| Customer feedback test | Check your VDR provider on Capterra, SoftwareAdvice, GetApp, and other reliable review websites. Check VDR review articles. Prioritise VDR providers with high scores and a high review count. |
| Terms and conditions research | Research the VDR provider’s terms of use and privacy policy. Check the user agreement for hidden fees and other pitfalls, such as automatic renewal penalties or ambiguous data ownership clauses. |
Step #3: Create an admin account
To manage your data room, start by creating an administrator account with full privileges. This foundational step takes less than five minutes:
- Register. Visit your VDR provider’s site → Click Sign Up → Enter business email and organisational details.
- Enable secure access. Create a strong password (12+ characters, mix cases/numbers/symbols). Immediately enable two-factor authentication (2FA), an industry-standard security requirement.
According to the UK Government’s 2025 Cyber Security Breaches Survey, only 40% of UK businesses and only 35% of charities implement multi-factor authentication across their networks and applications. Neglecting this measure substantially elevates breach risks for sensitive financial and legal documents.
Disclaimer: The configuration examples and screenshots on how to set up a virtual data room from this point forward illustrate the interface of Ideals Virtual Data Room. These are shown for demonstration convenience only. Please remember that configuration details vary significantly between providers and depend on your specific VDR’s capabilities.
Step #4: Create a data room project
To begin configuration, create a dedicated project workspace:
- Click Create new project
- Name your project (e.g. “Data Room for Company XYZ”)
- Select project Type → Choose Storage location (e.g. London)
- Add administrator emails under Administrators
- Check the agreement box → Click Create
Note: Storage limits and service terms auto-populate based on your subscription tier.
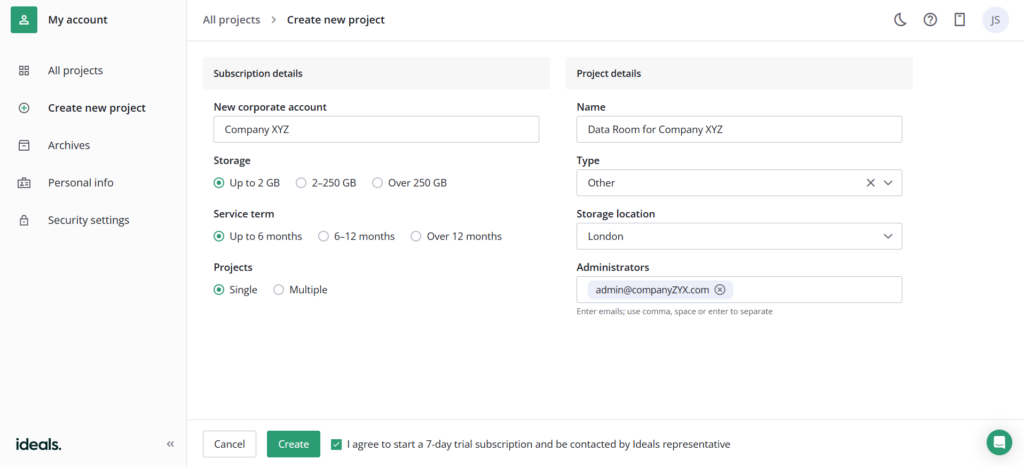
Creating a new project in Ideals Virtual Data Room. Showing project naming, storage selection, and administrator assignment during initial setup.
Step #5: Organise folder & file structure
Here are the steps to manage documents in a data room:
- Go to Documents
- Click Add → Create folders (e.g. “Legal,” “Financials”)
- Enable Index → Select “Index” for automatic numbering
- Apply Labels under Notes → Create categories (e.g. “Pending Review”)
- Set Quick Access preferences (e.g. Favorites)
Special note: You can bulk upload entire folder structures via drag-and-drop with most data room software solutions. For complex hierarchies, use spreadsheet imports (XLSX) to map parent/child relationships automatically.
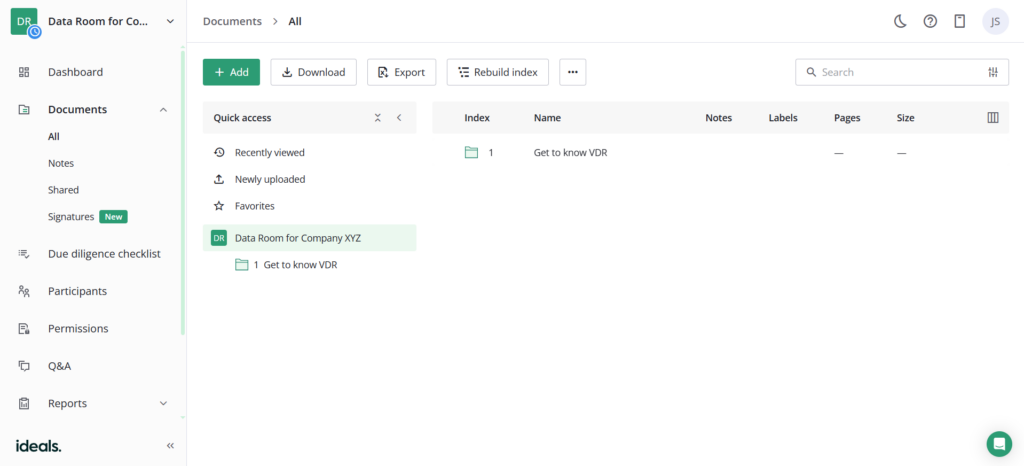
The document management interface with Index, Labels, and Quick Access settings in Ideals VDR
Step #6: Set roles, groups, and permissions
This is a sequential process. First, create groups, then configure their feature permissions (which define how the group interacts with data room capabilities like project management, user management, reports, and due diligence checklists), document access rights, security settings, and finally invite users.
Create groups and assign roles
Follow these steps to create a group and configure its feature permissions:
- Name Group
- Select Role Type: Administrator (Full control), User (Access to documents and user activity within a group), Custom (Tailored permissions)
- Configure Feature Permissions if you select a custom group role. Toggle access to specific modules (e.g. enable Reports but disable Project Management)
- Click Next
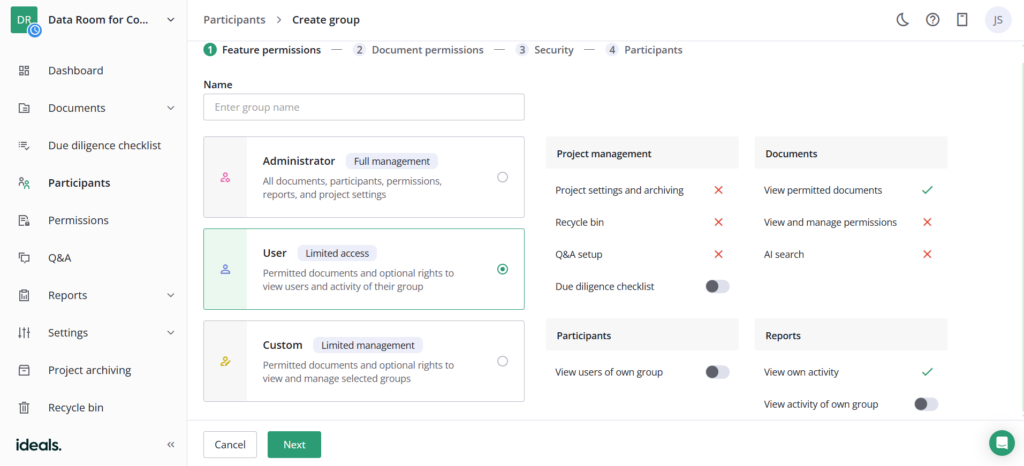
Ideals VDR interface showing feature permission toggles for user groups.
Configure document access permissions
After creating a group/groups, define how members of that group/groups share confidential documents in the data room workspace:
- Select Document/Folder (e.g., “Financial Records”)
- Set permissions:
- No access. Complete invisibility (default for root folder)
- Fence. Browser-only viewing with masked areas and anti-screenshot protection
- View. Watermarked browsing with Excel formula visibility control
- Encrypted. Download with persistent information rights management (IRM) protection (requires authentication)
- PDF. Watermarked PDF download (no usage tracking post-download)
- Original. Unrestricted native file download (highest risk)
- Upload. Add new documents + all lower permissions
- Manage. Full control (delete/move/redact) + upload rights
- Apply to subfolders. Enable cascade to child items
- Click Next
Critical note. Permissions apply to entire groups and cascade downward (higher levels include lower rights).
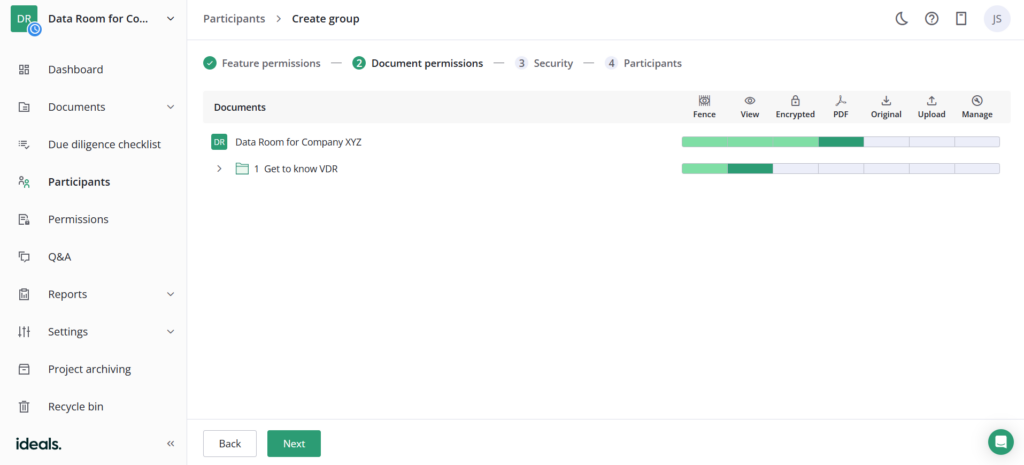
Ideals VDR document permission interface showing tiered access dropdowns.
After setting document permissions, establish project access controls:
- Project Access Duration: Unlimited (No expiration), Specific Dates (Set start/end dates (e.g., due diligence period), Deactivated (Immediate access revocation)
- Two-Step Verification: Enable mandatory 2FA for all group members
- IP Restrictions: Add allowed IP ranges (e.g. “192.168.1.0/24” for the London office)
- Confirm: Click Next → Invitations sent immediately
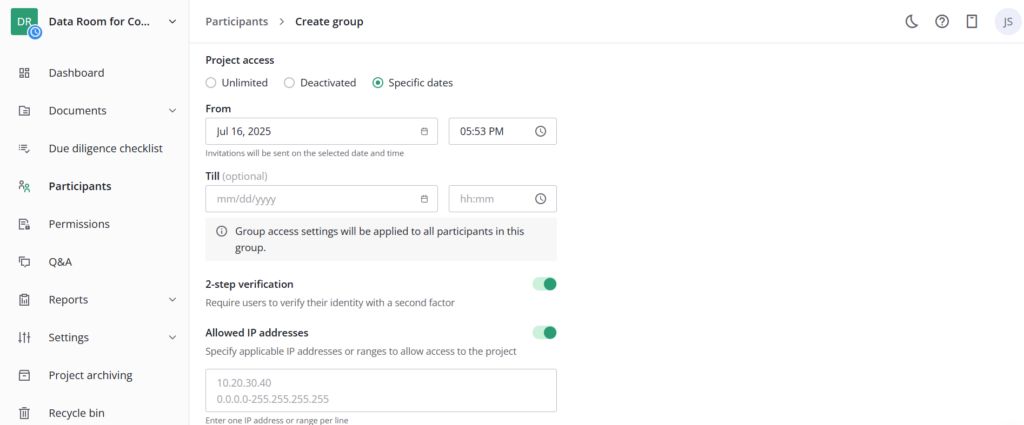
Ideals VDR security interface showing access duration, 2FA toggle, and IP whitelisting.
Invite participants
Finalise group setup by adding members:
- Enter Emails. Input participant addresses (separate with commas/spaces/returns)
Example: legal@company.co.uk, advisor@firm.com - Specify Names. Add full names for identification (e.g. “Sarah Chen – Legal Counsel”)
- Set Language. Choose invitation language (default: English (United States))
- Complete. Click Send Invitations → Members receive instant access instructions
Note: Participants inherit the group’s pre-configured document permissions and security rules.

Ideals VDR participant invitation interface showing email input and language selection.
How to speed up setting up a data room?
The lack of digital skills is the number one challenge when setting up a virtual data room. While 92% of all jobs require software skills, only one-third of employees have sufficient digital proficiency. Regarding VDR, you can follow these three practices to overcome adoption challenges:
- Subscribe to VDR training. VDR providers offer onboarding support as part of subscription plans, including live training with VDR experts.
- Use VDR documentation. VDR providers have dedicated help centers with how-to articles on different aspects of VDR software.
- Leverage VDR configuration videos. VDR providers often have dedicated YouTube channels with educational content or provide it in their dedicated Help Center on the official website.
The bottom line
Virtual data rooms transform high-stakes transactions, from M&A to fundraising, by centralising secure document sharing, audit-compliant workflows, and multi-party collaboration. With your VDR now operational, shift focus to ongoing management:
- Activity monitoring. Run weekly access reports to track document views/downloads.
- Permission audits. Quarterly review of group/user access tiers and remove inactive users promptly
- Scheduled data usage reports. Generate monthly document heatmaps showing frequently accessed files and archive activity logs for record retention compliance.
Additional resources:
- Essential Data Room Features for UK Transactions
- Secure Backup Strategies for Sensitive Documents
- Building a Compliant Data Room Index
FAQ
How long does setting up a data room take?
Most businesses configure basic data rooms in under 15 minutes with provider-guided setup. For complex M&A transactions, allow 1-2 days for permissions and folder refinement. You can request a dedicated project manager for accelerated 1-to-1 configuration support.
Can I change permissions after setup?
Absolutely. You can add/remove users, modify access tiers, or revoke document access in real-time. We recommend quarterly permission audits to align with project milestones.
Are virtual data rooms secure for sensitive documents?
Enterprise VDRs ensure military-grade security, such as end-to-end encryption, geoblocking, IRM, GDPR-compliant audit trails, and remote data wipe.